News:

2box forum: accident-free since the last one.

Main Menu
Menu

Show posts

This section allows you to view all posts made by this member. Note that you can only see posts made in areas you currently have access to.

Show posts Menu

Topics - Manfred

#1
Hello,

there is an open source drum plugin called DrumGizmo. And there are also multilayer samples of 5 drum kits available under the creative commons license.

https://www.drumgizmo.org/wiki/doku.php?id=kits

I wonder if anyone has already created DSND files for our 2Box modules out of that samples?

Regards

Manfred
#2
Hello,

since there seem to be a few people who have done the SD card mod at their DrumIt Three module i wonder if anyone could provide photos with high resolution of the electronic board. I'm interested to see was has changed in the hardware compared to my DrumIt Five. From the low res photos i saw there are still the footprints for the additional 2 outputs, the additional dials and knobs. So i wonder if it is even the same PCB inside both modules. But i doubt that since i guess they changed something at the trigger inputs.

Anyway, is there anybody who has some pictures with high resolution where you can see all the components? I'm interested to see both sides of the board.

Thanks and regards,

Manfred
#3

Hello,

Sennheiser just released a free VSTi which includes Samples of a drum set. Haven't tested it but since the download is a 4.7GB file i guess it includes a lot of Samples. Unfortunately i couldn't find it on the English web page but here is the link to the german page:

http://de-de.sennheiser.com/service-support/drummica

On the left hand side you can click on "JETZT DOWNLOADEN>" which leads you to the download page. There you can find the downloads for Mac and Windows.

Would be nice to hear your opinion about the sounds.

Regards, Manfred
#4
General 2box Drumit 5 forum / Christmas gift 2011
December 25, 2011, 02:33:11 AM

Hello,

continuing the "old" tradition from 2009 and 2010 the homepage is updated and comes with christmas gifts for us 2Box users:

- New Drum Samples (Beech drums)
- 3 Cymbal and 1 Hihat Sound
- Editor version 1.04 (capable to create multizone sounds and loops)

Thank you very much 2Box!!

Regards, Manfred
#5
General 2box Drumit 5 forum / Edge protection at cymbals
December 20, 2011, 12:13:22 PM

Hello,

i got my kit now since end of 2009. Recently i bought another cymbal (second hand) and noticed that the new cymbal doesn't have an edge protection like the old ones have. The new cymbal is about a half a year old and the seller confirmed that he didn't change anything at the cymbal. So i wonder why 2Box removed the edge protection, any ideas? Do your cymbals have these edge protection?

This is how the old cymbals look like:


And this is the new cymbal:


There are a few posts around the forums where people report damaged rubbers at the edge. Thats why i'm a bit concerned about the new cymbal. Or do you think this edge protection doesn't help at all?

Regards, Manfred
#6
e-drum DIY / modifications / SD card compatibility list
December 03, 2011, 11:02:22 AM
Hi,

i thought it might be useful to have a SD card compatibility list for the 2Box module. So it would be nice if everybody could post which card has been in the module originally and what cards have proven to work. I will update this post accordingly. Please write the description of the cards as specific as possible. And recommendations for other cards if you are sure that they work. Not just tested for a few minutes but for a longer time. So lets start:


Original cards in the modules:

- Sandisk Extreme III 4GB SDHC class 6
- ATP Pro Max 4GB class 10
- 4GB Kingston SDHC Class 6


Cards that have proven to work:

- Sandisk Extreme 32GB SDHC class 10 30MB/s (different label prior to HD-video)
- Lexar Professional 32GB SDHC class 10 133x speed (see reply 24)
- Lexar Professional 16GB SDHC Class 10 133x  20Mb/sec (see reply 46)
- PNY Professional 32GB SDHC Class 10 20MB/s (133X) (see reply 115)

- Silicon Power 32GB SDHC class 10 ( ?? latency problems reported in post #73)

- Sandisk Extreme HD-Video 32 GB SDHC class 10 30MB/s (see reply 7)
- Sandisk Extreme Pro 32GB SDHC 45MB/s (see reply 8 )
#7
Hello,

last week i bought a Yamaha PCY-155 and would like to share the results of my tests. Out of the box it can be used as a 2-zone crash. With some minor modifications it can also be used as 2-zone ride or hihat. As far as i know the PCY-135 uses the same circuit board. So the following descriptions should also match for that.

General description:

The cymbal has a piezo wired to the tip of the TRS jack. In addition there are 3 switches wired to the ring of the TRS jack. Two to detect edge hits and the third to detect bell hits. The switches at the edge are in parallel and have a series resistor. This resistor is used by Yamaha modules to differentiate between edge and bell. The 2Box module can not detect the difference between bell and edge switches so bell and edge will trigger the same sound. Directly connected to the piezo is a voltage divider (two resistors and a potentiometer) to lower and adjust the output signal.

Schematic:


Picture top layer:


Picture bottom layer:


#8
e-drum DIY / modifications / SD-Card mod step by step
August 26, 2011, 08:41:48 PM
Hello,

since it is not available anymore at the 2Box-Homepage i thought i post a description how to replace the SD-Card or put in a SD-Card-Extender. I received the SD-Card-Extender this morning and couldn't wait to put it in. Here is the description how i did it which is almost the same that was at the homepage:

Please make sure you disconnect the Unit from the mains power, before beginning any work on the Unit. For ESD reasons avoid touching any components or plated areas or wear an ESD strap. On the housing one can read "Warranty void if opened", so do at your own risk.

Required Tools

- Phillips screwdriver
- Torx screwdriver TX10
- Tool to remove nuts (flat pliers works fine)


Step 1

Remove the 3 rotary dial knobs and the level knob from the top panel by pulling them straight up.


Step 2

Take the Phillips screwdriver an unscrew the 4 screws on the 2 MIDI sockets.


Step 3

Unscrew and remove the 18 nuts from the jack sockets.


Step 4

Turn the unit upside down and place it on a soft surface. Unscrew the 5 Torx screws holding the lower lid to the upper orange lid.


Step 5

Gently lift up the front edge of the lower lid and move it down slightly and then backwards to release it from the jack sockets.


Step 6

Remove the bottom lid and you will now see the circuit board. Avoid touching any components or plated areas. Remove the 9 screws holding the circuit board to the upper lid. Lift up the circuit board by holding it at the jack sockets and the edges. Locate the SD-card slot holder on the left hand side.


Step 7

To remove the SD card, ease it out gently from the holder. Now insert your SD-Card-Extender.
WARNING: Be careful to run the flat cable straight out of the module as pictured. If the cable placement is too close to the module corner the cable will be pinched/creased and rendered useless. When placed correctly there is ample room for the cable to slide freely between the module casing and the bottom cover plate.


Step 8

Insert the circuit board back in to position and very gently screw the 9 screws back in to place. There is no need to over tighten the screws. As soon as the screw meets the circuit boards surface you are fine.


Step 9

With the orange lid still upside down, take the lower lid and angle it in to the small recess underneath the jack sockets. Gently pull the front edge towards you and then down to meet the front of the orange metal work, making sure the holes on the lower lid slide over the jack sockets.


Step 10

Gently screw the 5 torx screws back in to position. Again taking care not to over tighten them.


Step 11

Screw all 18 jack socket nuts back on the jack sockets.


Step 12

Screw the 4 MIDI screws back in to place.


Step 13

Turn the unit up again and replace the 3 rotary dial knobs and the level knob. Be aware of the flat marker area inside the knob matching the detent on the shaft.


Step 14

You can use double sided tape to fix card reader on the housing.


Step 15

Insert SD-Card to card reader and test the unit. If everything is okay the unit boots up as normal. If you put in a card with more than 4GB it might take a few seconds more to boot up. To prepare other SD-Cards simply copy operating system, settings-file and sounds from you old card.


Have fun!!
#9

Hi,

interesting to see this old video from 2008:

http://www.sonicstate.com/news/2008/03/14/messe08-the-drums-are-bright-the-drums-are-orange/

There Rik explains the features of the system. Glad that they decided to ship the unit with 4GB and to make a 2 zone hihat . But that the memory is not expandable by the user is not 100% true  :D

Unfortunately the collaboration with FXpansion and Toontrack did not happen. But since it is possible to convert any WAV sample to a DSND file this is acceptable. In my opinion this is way better than having any kind of DRM system in the module.

Also nice to see that there was one more button on the prototype of the module.

Regards, Manfred
#10
Hello,

yesterday i completed assembly of my hihat adapter which i developed to use cymbals of other brands as a hihat at the 2Box. This is how it looks:


It has 2 connectors. One to connect it to the brain and the other to connect a cymbal. Up to now i tried it with a Roland CY-5 but most other 2 zone cymbals should work. With the CY-5 it works quite good! Important is just that it has a piezo for the bow and a switch for the edge.

It is based on the schematic of the original 2Box hihat which i posted in the other hihat thread. The only disadvantage i found up to now is the price. Making printed circuit boards in small quantities is expensive.

Anyway, more info will follow the next days and maybe also a video of a 2Box with a Roland CY-5 hihat  :D

Regards, Manfred


Edit 10.09.2011:

Video Roland CY-5:
http://www.youtube.com/watch?v=6mRekNSxh5c

Video Yamaha PCY-155:
http://www.youtube.com/watch?v=v1zYmUzp1eY
#11
e-drum DIY / modifications / 2Box Hihat Controller
June 04, 2011, 08:46:49 PM
Hello,

finally i opened my hihat because i wanted to know how it works. Some people are talking about "magnetic vodoo" but its not that complicated  :) 
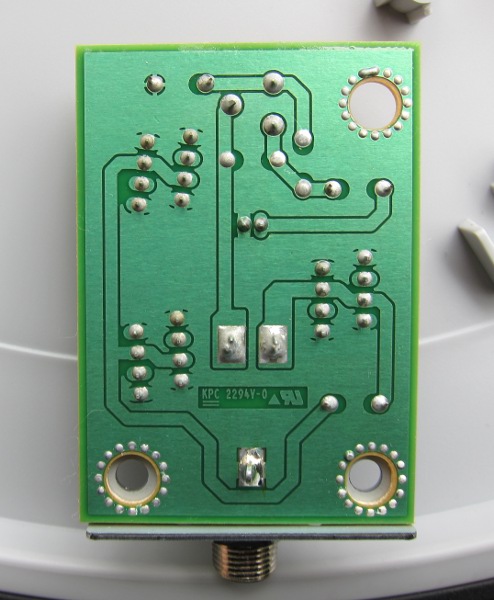
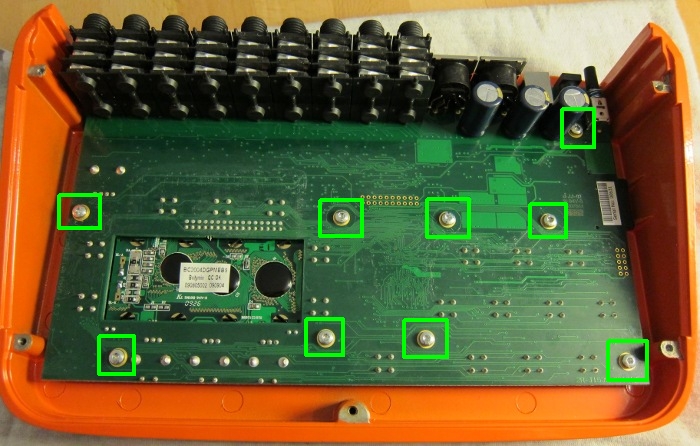
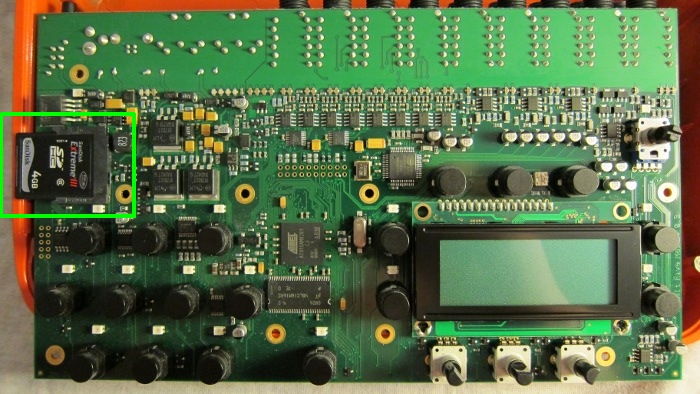
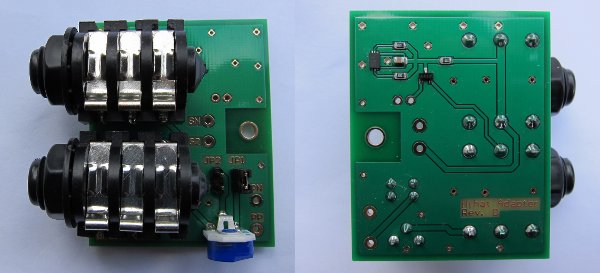
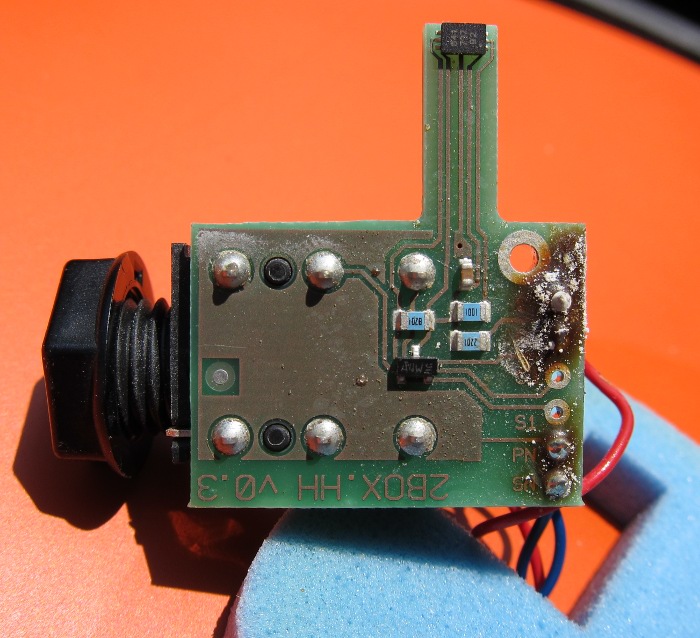
The first thing i saw was that the PCB was not cleaned properly. Due to that it started to rot. Here is a picture:


By the way, the chip on top is the (magnetic) hall sensor. After cleaning it looks like this:


And finally after cleaning and soldering:


Of course i tried to draw the schematic:


Any comments are welcome  :)

Regards, Manfred
#12
General 2box Drumit 5 forum / Line Outputs
January 09, 2011, 10:47:54 AM

Hello,

i have two questions regarding the six line outputs of the 2Box module:

1. Which level do the outputs have. Is it the "professional" +4dbu or consumer standard with -10dbV?

2. What kind of Jacks should be used, mono (unbalanced) or stereo (balanced)? At the manual one can read:

Quote
The OUT1-6 outputs have the ring contact to ground. So if a balanced TRS to XLR cable would be used, the XLR negative signal is
correctly grounded.

So i guess it doesn't matter if it is a stereo or mono jack?

Manfred

#13
e-drum DIY / modifications / Electronic dropclutch
December 27, 2010, 12:46:07 AM

Hello,

since it is not possible to use a common dropclutch at the 2Box hihat i started to build an electronic dropclutch. Maybe this is an interesting thought for others who want to use a double bass pedal. I used the following parts for my prototype:

- Stereo cable with TRS-Jacks
- 100 Ohm potentiometer
- Switch

I cutted the cable and putted the switch and poti in the ring wire:


If the switch is closed the hihat can be played normally. If the the switch is open the hihat is dropped. With the poti the level of the hihat in "dropped mode" can be adjusted. This is just a prototype, later on the switch will be replaced by a footswitch.

Here is a video with a short demonstration:


Hope that helps!

Regards, Manfred
#14
General 2box Drumit 5 forum / We are updating!
December 25, 2010, 03:06:08 AM

Please come back soon to check out new media.

Exciting, lets see what Santa will bring us.....
#15

Good morning,

as mentioned in other threads i am using two Milleniums MPS200 cymbals at the Tom 4 Input. But there is the problem that crash sounds are sometimes halted. It occurs quite often at one of the two cymbals. At the other one i heard it only once. Sometimes i can play for a long time without any halted sounds but sometimes one out of three hits is halted. Here are two sound files with several hits on the two cymbals:

http://www.4shared.com/audio/zJ3NQCxg/Cymbal1.html
http://www.4shared.com/audio/7PDjk2FE/Cymbal2.html

Does anybody have similar problems? I swapped the inputs for the cymbals but the problem remains on the same cymbal-pad. So i guess there is something wrong with the pad. Do you also think it is caused by a faulty cymbal or just an issue of trigger settings?

Trigger setting for both pads are:

Curve: Norm
Gain: 0
Thres: -36
Type: Cym12

Manfred

#16
e-drum DIY / modifications / First step to DIY-hihat
April 11, 2010, 06:54:54 PM
Hello,

for those of you which are interested in using the 2Box-Brain with other pads and cymbals i did a small test regarding the Hihat. There are reports that other pads and cymbals already work out of the box with the 2Box-Brain but there is no compatible hihat at the market. So lets see if we can create one by ourselves.

At first i measured the voltages and currents of the ring-contact of the connector when i open and close the hihat. The oscilloscope shows that there is just DC and no AC or digital signal. Further on my multimeters show the following values:

Open HiHat: 3.81 Volts / 4.48 mA
Closed Hihat: 3.81 Volts / 4.07 mA

This means a resistance of 850 Ohms for the open hihat and 936 Ohms for the closed hihat. After that i took 2 resistors of 820 Ohms and 27 Ohms and a potentiometer with 100 Ohms. Connected the 3 resistors in series results in a variable resistor from 847 Ohms to 947 Ohms. This fits almost to the range measured before.

If you connect these resistors between the ring and the sleeve contact you can open and close the hihat by turning the potentiometer. Here are two videos where i tried to film the results. The quality is very very poor but you can divine the bargraph of the pedal at the UNIT-TRIG-page. It changes when i turn the poti with the screwdriver. Sorry for the quality but my digicam is 8 years old and the video function is almost unusable.

http://www.4shared.com/video/-ABlpPiq/P1010008.html
http://www.4shared.com/video/ZPueh4g-/P1010009.html

If you have a pedal working with resistive sensing you can maybe modify it to the correct resistor values. Of course you can also create a DIY-solution. I have no cymbal pad from an other vendor so i couldn't test if this would work instead the original one. This would be the second step on the way to a complete Hihat.

Greets, Manfred
#17
General 2box Drumit 5 forum / How many Zones....
January 30, 2010, 10:08:54 PM

...does the Hihat have?

When I watch the Trigger-Page while playing the Hihat I can see "Zone 3", "Zone 8" and "Zone 9" in the display. But I cant't really find out where these zones are. Using the pedal leads to "Zone 9" in the display. If the Hihat is closed the edge seems to be Zone 3 and 8 is the bow. But if the hihat is open almost always "Zone 8" is displayed.

Since the Hihat uses a simple stereo jack and the ring is used for sensing the pedal position, there is only one contact left. Does this mean that the Hihat is a One-Zone-Cymbal?

Greets, Manfred
#18
Hello,

i would like to ask 2Box (deve loper?) if they could publish the specification for *.dsnd files. Obviously it is a kind of WAV-file and the sound data is stored in PCM format. Due to this it should be "easy" to create sounds for the 2Box even though the 2Box-Editor is not released.

I think this would be a great feature an the number of available sounds increases pretty fast. And maybe somebody starts with developing software to create sounds. Anyway the users would have the freedom to do so.

Greets, Manfred
#19

Hi,

since yesterday I have my new 2Box-kit.

In the standard-configuration the snare is double-triggering. I tried to fix it by changing the tension of the head but not really successful. Increasing the thresh from -48 to -40 reduces most of the double triggers. But of course the sensitivitiy is also reduced. Very weak hits are suppressed with these settings

Is there a way to avoid double triggering without reducing the sensitivity?

Greets, Manfred